
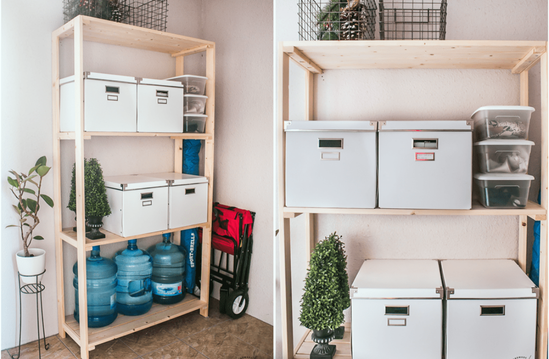
Need extra storage without spending a fortune? This diy woodworking projects storage shelf from Artisanalhomes is an easy, budget-friendly solution for any American home. Perfect for garages, offices, or pantries, our diy projects easy guide makes building accessible for beginners and pros alike. Let’s create a sturdy, stylish shelf in just a weekend!
1. Gather Materials and Tools for Your DIY Woodworking Project
Starting with the right materials sets your diy woodworking projects up for success. This shelf uses affordable, easy-to-find supplies. You’ll need wood boards: one 1x2 at 72 inches, one 1x2 at 120 inches, four 1x3 at 72 inches, four 1x4 at 120 inches, and one 1x4 at 96 inches. We suggest sourcing these from Home Depot or Lowe’s for under $50 total. These wood diy projects keep costs low while ensuring durability. Your shelf will be sturdy enough for books or pantry items.
For tools, grab a circular saw, miter saw, tape measure, clamps, and a cordless drill. A Kreg Pocket-Hole Jig 720 is ideal for strong joints, but a standard drill works too. Our team recommends borrowing tools or checking local hardware stores for budget-friendly options. This diy projects easy prep step ensures you’re ready to build. Keep your workspace organized for a smooth start.
You’ll also need 96 1-1/2-inch screws and wood glue for assembly. We love using supplies from Dollar Tree or Amazon for affordability. These basics make the project beginner-friendly and quick. Gather everything before starting to save time. Your shelf will come together effortlessly.

Starting with the right materials sets your diy projects up for success
2. Add Pocket Holes to Cut Boards
Pocket holes make your diy woodworking projects strong and professional-looking. This step preps your boards for easy assembly.
Cut eight 1x2 boards to 9-1/2 inches for the frame sides and add pocket holes vertically at each end. Use a Kreg Jig or drill angled holes with a standard drill for diy projects easy. Our team suggests marking holes clearly to avoid mistakes. This step takes about 30 minutes. Your frame will be ready for sturdy connections.
For the bottom shelf holders, cut eight 1x2 boards to 14-1/2 inches and add horizontal pocket holes. We recommend spacing holes evenly for strength. A Kreg Jig simplifies this, but a steady hand with a drill works too. This prep ensures your shelves hold weight securely. Your project will feel solid and reliable.
Double-check your cuts with a tape measure before drilling. Our team loves this do it yourself diy projects tip to avoid errors. Accurate pocket holes save time during assembly. Keep your workspace clear to stay focused. You’ll be set for a smooth build.

Pocket holes make project strong and professional-looking
3. Assemble the Wooden Shelves
Building the shelves is the heart of your diy woodworking projects. This step creates the flat surfaces for storage. Cut sixteen 1x4 boards to 36 inches for the shelf surfaces. Arrange four boards per shelf, leaving a 1/4-inch gap between them to prevent mold or leaks. We suggest using spacers like coins for diy projects easy accuracy. Apply wood glue and clamp the boards to the 14-1/2-inch bottom shelf holders. This creates four strong 3-foot-long shelves.
Use a countersink drill bit to make room for 1-1/2-inch screws. Predrill and screw the bottom shelf holders to the boards underneath for a secure diy projects bond. Our team recommends working on a flat surface for alignment. This step takes about an hour and ensures durability. Your shelves will handle heavy items with ease.
Check the gaps and alignment before screws set. We love this diy projects home improvement tip to keep your shelves even. Tighten screws carefully to avoid splitting the wood. Your shelves will look polished and ready for the frame. This step brings your project to life.

Building the shelves is the heart
4. Build the Frame Structure
The frame gives your diy woodworking projects stability and height. This step creates a tall, sturdy structure. Use four 1x3 boards at 72 inches for the vertical frame pieces. Space them with the eight 9-1/2-inch 1x2 boards at 4 inches, 26-1/2 inches, 49 inches, and the top. We suggest applying wood glue and securing with pocket hole screws for diy projects easy strength. This creates a ladder-like frame that’s both functional and stylish.
Clamp the boards to ensure tight joints during assembly. Our team recommends a 90-degree corner guide for precision. This step takes about an hour and forms the backbone of your shelf. Work on a flat surface to keep everything level. Your frame will stand tall and strong.
Double-check measurements before screwing to avoid wobbling. We love this do it yourself diy projects tip for a professional finish. Test the frame’s stability by gently shaking it. Your structure will be ready to support the shelves. This step sets the stage for a solid unit.

The frame gives your diy project stability and height
5. Attach the Shelves to the Frame
Attaching shelves to the frame is a key diy woodworking projects step. This connects your shelves for a cohesive unit. Lay the frame flat and attach the top and bottom shelves first for diy projects easy stability. Use 1-1/2-inch screws through the pocket holes, avoiding glue if you want a movable shelf later. Our team suggests starting with these shelves to keep the frame aligned. This step takes about 45 minutes and ensures a sturdy base.
Place the second frame on top and secure the top and bottom shelves to it. Use a 90-degree corner guide to keep everything level, even when working sideways. We recommend this diy projects home improvement trick for precision. Clamps hold shelves in place while you screw. Your unit will start looking like a finished piece.
Lift the unit upright and attach the remaining two shelves. We suggest using clamps for diy woodworking projects accuracy and checking alignment with a level. Screw through the pocket holes to secure each shelf. Your storage unit will be functional and ready for finishing touches.

Attaching shelves to the frame connects your shelves for a cohesive unit
6. Add Final Shelves and Secure All Sides
Finalizing the shelves completes your diy woodworking projects. This step ensures every part is secure and ready for use. Double-check the middle shelves’ alignment before securing them permanently. Use 1-1/2-inch screws through the pocket holes for diy projects easy assembly. Our team recommends tightening screws gradually to avoid shifting. This step takes about 30 minutes and locks in your shelves. Your unit will feel solid and reliable.
Inspect all sides for loose screws or gaps. We suggest adding extra screws if needed for diy woodworking projects durability. A quick shake test ensures stability for heavy items like books or tools. This step polishes your unit’s structure. Your shelf will be ready for any storage need.
If you want a movable unit, skip glue on the final shelves. Our team loves this do it yourself diy projects tip for flexibility in garages or pantries. Ensure all pocket holes are filled with screws for strength. Your shelf will stand strong and functional.

Double-check the middle shelves’ alignment before securing them permanently
7. Sand and Finish Your DIY Woodworking Shelf (Optional)
Sanding and finishing give your diy woodworking projects a polished look. This optional step adds style and protection. Sand the entire unit with medium-grit sandpaper to remove splinters or rough edges. We recommend a cordless sander for diy projects easy efficiency, available at hardware stores. This takes about 30 minutes and preps the wood for finishing. Your shelf will feel smooth and professional.
Apply a stain or paint for a custom diy painting ideas for walls vibe. Use neutral white for Minimalist style or warm oak for Farmhouse charm. Our team suggests water-based stains from Home Depot for easy cleanup, costing under $15. Brush or wipe on for even coverage. Your shelf will match your home’s aesthetic perfectly.
Seal with polyurethane for durability, especially in high-traffic areas like garages. We love this diy projects home improvement step for protecting your wood diy projects. Let it dry overnight before use. Your shelf will look stunning and last for years.

Sanding and finishing is optional step that adds style and protection
Ready to build your own diy woodworking projects storage shelf? Artisanalhomes has all the inspiration and tools for a budget-friendly home upgrade. Visit our site for more diy projects easy and tutorials. Start crafting and share your sturdy creation today!